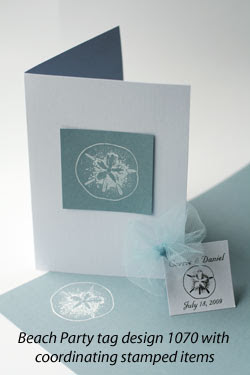
 So you're planning a party, and you've found that perfect design for the favors. And the invitations and envelopes. Oh, and maybe the place settings, napkin holders, thank you cards, wrapping paper...whew! This is a perfect job for a rubber stamp!
If you're crafty or into scrapbooking, you've probably worked with rubber stamps to add embellishments to cards or book pages. It's really easy (and relatively inexpensive) to turn a black and white graphic into a rubber stamp, and I'm going to show you how to do it using software you'll find on any PC.
First things first: you'll need a graphic. If you're working with a designer, you can request a TIF or JPEG of your logo or design. You can also draw your own picture or scan a copyright free design. One of my favorite sources for copyright-free designs is the Dover Electronic Clip Art Series; their CD-ROMs have dozens of images in a wide range of styles for lots of themes, and they're already in digital formats ready to use. (What you won't want to do: steal someone else's artwork. There are so many copyright-free graphics out there that it's completely unnecessary!) For the purpose of this tutorial, I'm going to use a TIF from Dover's Seashore Life Illustrations CD-ROM.

• Once you've chosen your graphic, open your Paint program (click the Start button in the lower left corner of your screen, choose All Programs, and you'll find it in the Accessories folder).
• Under the File menu, choose Open and select the CD-ROM, browsing to the TIF folder. Double click on the graphic you want to work with (see mine circled in red above).

• Rubber stamps can be ordered in sizes ranging from fractions of an inch to several inches in height, and price will vary according to size. I chose to order my stamp at 1.5" square, so I needed to resize my graphic. Find the size of your graphic by choosing Attributes, under the Image menu. Then under the Image menu, choose Resize/Skew and adjust the percentages to resize horizontally and vertically (see above).
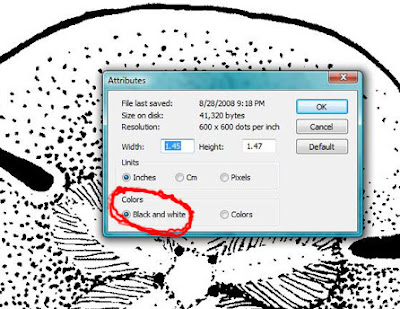
• To finalize your graphic, choose the Attributes option under the Image menu. Make sure that your graphic has a resolution of 500 to 600 dpi (dots per inch). Check the width and height to make sure they will fit on the stamp size you'd like to order. Reduce the graphic size with the Resize/Skew option as described above until the graphic is the correct size.
Finally, under Colors, select the Black and white option, then click OK (see above).
• Save your new graphic by choosing Save As from the File menu, then choose the location for the file, name your graphic, and click Save.
Repeat this process for additional graphics, or resize and save this same graphic a second or third time for different sized stamps. (Use the tinier stamps for envelopes or tags, for example, larger ones for cards, and multiple sizes for wrapping or decorating papers.)
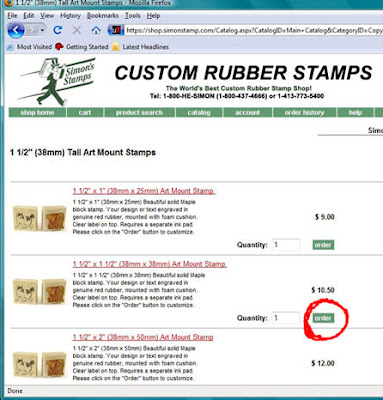
Now that you have your graphic ready, you'll want to choose a web site to order your rubber stamp. I chose Simon's Stamps for their Custom Made Art Mount Stamps.
• I selected the 1 1/2" Tall Art Mount Stamps, then chose the stamp that was 1 1/2" x 1 1/2", clicking the order button (see circled above).
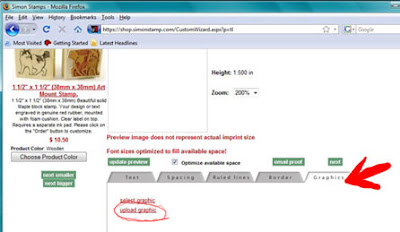
• Now you'll need to upload your graphic. Click the graphics tab (see the red arrow above) and then click the Upload Graphic link (circled in red). Browse to the file of your graphic, select and upload.
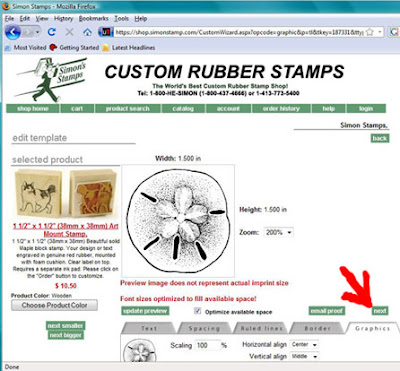
• Check the preview of your image (see my sand dollar in the window above?) and make sure it looks correct. Then click Next (see arrow) to proceed to checkout.
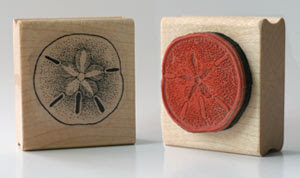
• Choose your shipping and complete your payment, and that's it! Now just wait for your rubber stamp to arrive!
<----this a="" check="" for="" href="http://www.stampinart.com/gallery/index.php" ideas="" is="" like.="" links:="" looks="" mine="" more="" out="" projects="" stamping="" these="" what="">Stampin' Art Gallery
Hero Arts Online
Rubber Stamping Gallery
Please comment below to share your stamping ideas and resources!

Hey Emily,
ReplyDeleteWe're glad you like your rubber stamp!
Simon from Simon's Stamps